Understanding Reflex
Reflex has a great introduction to basics and a dashboard tutorial, which are recommended to understand the basic concepts and get you practicing.
However, after using Reflex for a while, I have developed a mental models which I find helpful. I'll introduce it below.
The examples in this guide will often have a function decorated with @rx.page. This allows you to create a Stoneware V2 page file and copy/paste code in there to try it out.
# apps/stoneware-v2/src/stoneware_v2/pages/reflex_guide.py

# Available at http://localhost:3000/counter
@rx.page("/counter")
def counter():
  # Example here
  ...
TL;DR:
- Components are frontend code, event handlers and computed vars are backend code.
- Keep frontend code really simple. Perform data transformations on the backend.
- State is shared across frontend and backend. State values need to be
int,float,bool,str,list,tuple,dict,set, or a dataclass containing valid state values. - A state value can be accessed in two ways:
- As a regular Python value in the backend, through
self - As a var in the frontend, through the state class
- As a regular Python value in the backend, through
- Events connect the frontend and the backend. They are most often triggered by user interactions.
- State can only be modified in event handlers.
How it works
Under the hood, Reflex runs your Python code and generates a React application, one of the most popular JavaScript libraries to build user interfaces.
To be more specific, Reflex generates a Next.js application. Next.js is the most popular React framework. To explain the difference:
- React is what takes care of generating HTML from JavaScript code and applying updates to the HTML when something changes
- Next.js provides routing (how you navigate across different URLs), backend capabilities, and other convenient features like links that download the next page in advance when the user hovers over them.
In addition, Reflex also generates a Python backend, which handles events, like when a user clicks on a button. The frontend connects to the backend through a WebSocket, which is a protocol for fast two-way communication.
The mental model
Like all React applications, there are two phases in a Reflex app: the initial render and subsequent updates.
The goal of React is to enable you to write your user interface as function of your application's state. This is the render logic.
TODO: image
Then, when something occurs (an "event"), the state gets updated, the render logic reruns, and produces a new user interface.
TODO: image
React then compares that new interface to the one already displayed in the user's browser, determines the set of changes required to update the UI, and applies them. This is often called diffing.
This is a declarative approach, where your code "declares" what the user interface should be depending on the state, and React takes care of applying updates whenever the state changes.
Reflex is there to:
- Generate the React application that runs in the user's browser
- Generate the Python server that runs the backend logic
- Handle the communication between the two.
Putting it together, the full Reflex loop is:
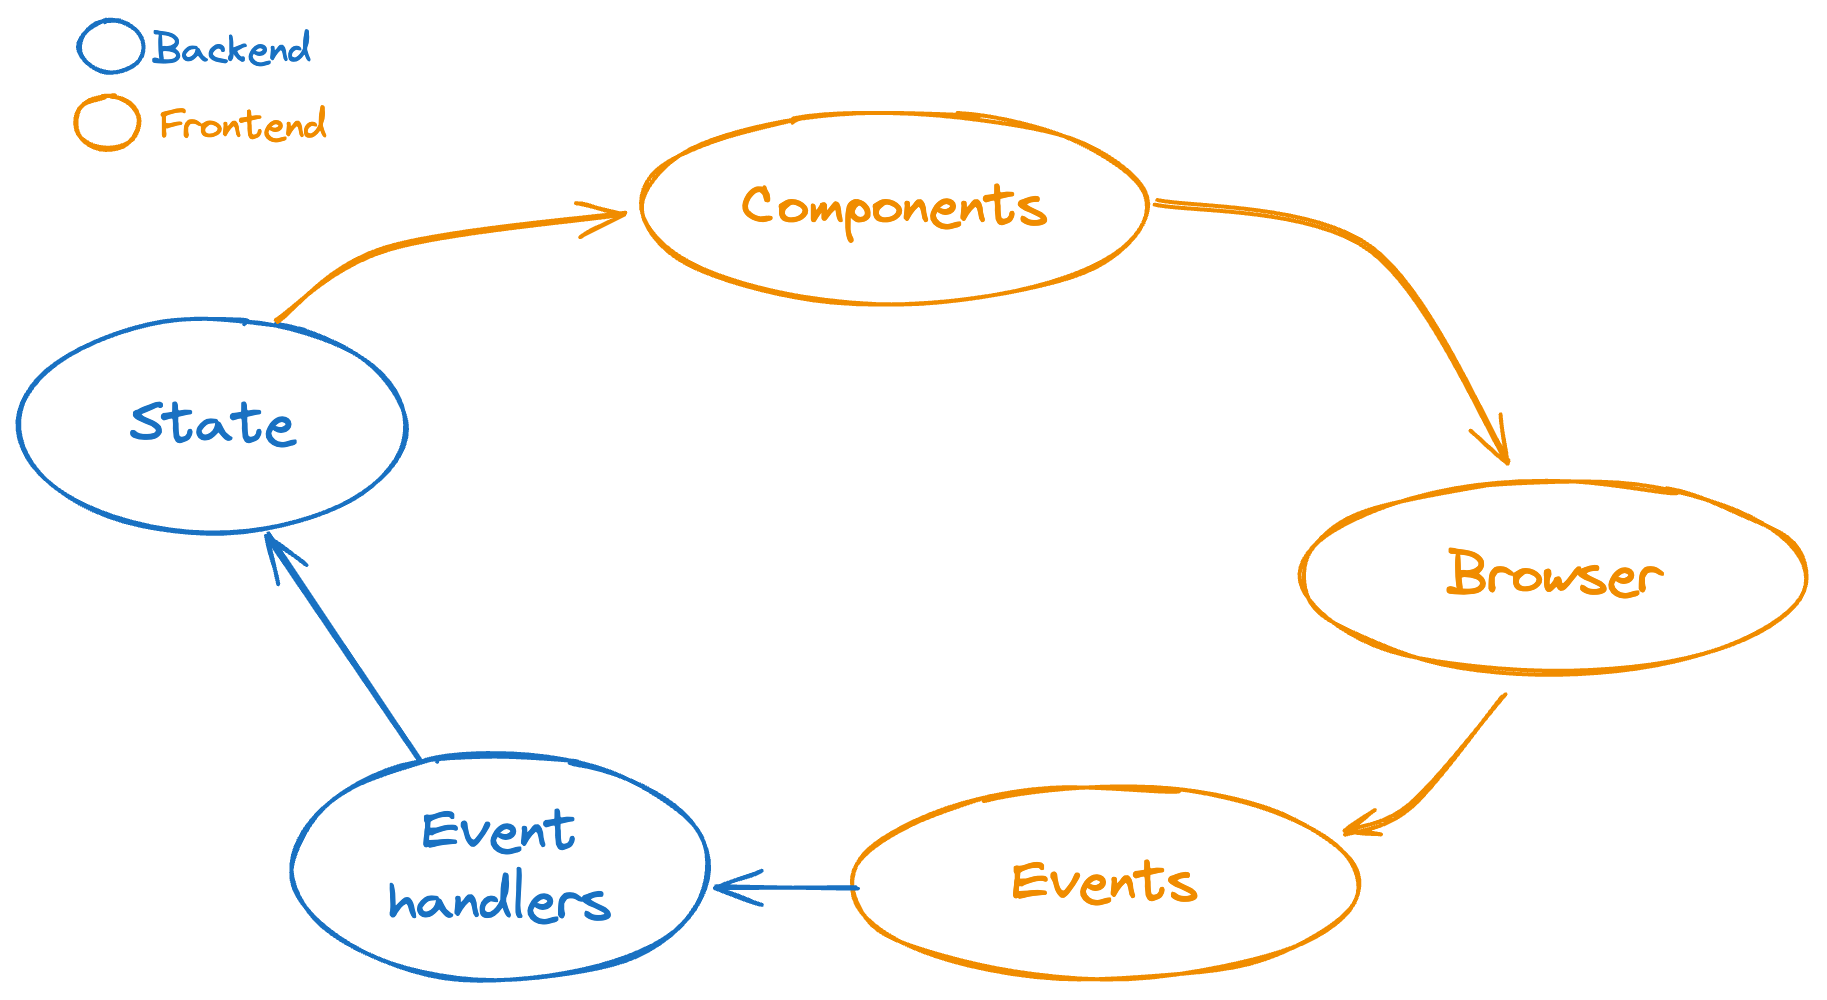
The key idea is that everything colored as "frontend" needs to be translated (= compiled) into JavaScript that runs in the browser. However, as we'll see, Reflex cannot compile arbitrary Python code.
This means that your frontend code can't be any Python code - it has to follow the "Reflex conventions".
As such, a crucial part of writing Reflex code is always keeping in mind which part of your code runs in the browser and which part runs on the server.
Once that is known, it's much easier to keep the frontend code as simple as possible and move the logic into the backend.
What is frontend code, what is backend code?
Compiling Python to JavaScript
Let's talk about how Reflex translates your frontend code into a React application in JavaScript code.
This may seem a bit technical - aren't we diving into Reflex internals before even talking about Reflex concepts? However, a simple example can give us a good understanding of Reflex that will avoid a lot of confusion down the line.
From Reflex's perspective, our application looks a bit like this:
# The render logic.
def page(app_state):
  # do stuff
  ...
  # return the user interface
  return components()
In practice the state lives outside the function, but this setup is easier to understand.
Now, Reflex needs to translate this page function into JavaScript code. The goal is to get something like this
function page(appState) {
  return components;
}
How can that be done? Something really challenging here is that we're translating a function to another function, so it has to work for any possible state. We can't just call page with a specific value, like the initial state.
Alright, let's look at a simpler example. Let's say we're building a system to convert Python code into JavaScript code, but only for arithmetic formulas.1
The Python code looks like this:
def add(a, b):
  return a + b
And the target JavaScript code is:
function add(a, b) {
  return a + b;
}
The common way to solve this problem is to pass in "placeholder" values instead of real numbers. When arithmetic operations are performed on these placeholders, they accumulate them and can convert them into formulas at the end.
Like Reflex, we'll call these placeholders "vars". Here's an example, just for addition:
from dataclasses import dataclass
from typing import Literal


# Base class for all vars
class Var:
  def __add__(self, other: "Var"):
    return BinaryOp(self, '+', other)

  # other math operations...

  # Has to be implemented by all subclasses
  def render(self) -> str:
    raise NotImplementedError()


@dataclass
class Value(Var):
  name: str

  def render(self) -> str:
    return self.name


@dataclass
class BinaryOp(Var):
  left: Var
  op: Literal['+', '-', '*', '/']
  right: Var

  def render(self) -> str:
    # For safety, we'll add parentheses around both `left` and `right`.
    # In practice, we'd only do this when necessary, based on operator priority,
    # but this keeps it simple.
    return f'({self.left.render()}) {self.op} ({self.right.render()})'


def add(a, b):
  return a + b

a = Value('a')
b = Value('b')
result = add(a, b)
print(result) # BinaryOp(left=Value(name='a'), op='+', right=Value(name='b'))
print(result.render()) # (a) + (b)
There we go, we can convert any arithmetic function into a valid formula! For simplicity, I'll skip the rest of the scaffolding to convert the Python function declaration into JavaScript. This idea of "placeholder" values, of vars, is the key thing to remember.
Reflex works in exactly the same way: it runs your frontend code by giving it Var objects, recording the operations performed, and generating the equivalent React code.
Let's keep this in mind as we dive into the next section.
Reflex concepts
Components
Components are reusable UI elements, the building blocks of your Reflex application.
Components are a function that returns a component object:
import reflex as rx

def my_button():
    return rx.button("Click Me")
Here rx.button is a built-in component.
The code above gets translated to:
function myButton() {
  return <Button>Click Me</Button>
}
Components can also take children (nested components) and props (keyword arguments).
def index():
    return rx.hstack(
        rx.link(
            rx.avatar(src=GithubState.profile_image),
            href=GithubState.url,
        ),
        rx.input(
            placeholder="Your Github username",
            on_blur=GithubState.set_profile,
        ),
    )
Here, the link and input are children of the hstack component. href is a prop of the link component.
The hierarchical nature of components matches how React and HTML work. The above will roughly produce the following HTML:
<div>
  <a href="https://github.com/...">
    <img src="https://...">
  </a>
  <input placeholder="Your Github username" onblur="...">
</div>
Note that the built-in hstack, link, avatar, and input components would add additional styling.
In this example, each component maps to a single HTML element and all the props are passed directly to the final HTML elements (with some modifications, as Reflex would take care of connecting the onblur event to the Python backend).
More generally, a component can map to a whole chunk of HTML and props can be used for any internal logic within it.
If you go back to our earlier diagram, components are frontend code. This means that we can't write arbitrary Python code in them, as components get compiled to JavaScript.
Thus, the recommended way of writing components is:
- Focus on presentation and styling, how your app should look.
- No complicated data transformations. Put those in states and event handlers.
- Only use
rx.condandrx.matchfor conditional logic,rx.foreachfor iteration - Follow the Stoneware guidelines (if working on Stoneware)
For more detail on exactly what is allowed in components, check the section below on writing frontend code.
States
States contain the application's dynamic data.
A state is a class that inherits from rx.State and contains fields. Generally, these fields contain data used to render components. When a state field is modified in an event handler, the components rerender and the user interface updates accordingly.
import reflex as rx

class CounterState(rx.State):
  count: int = 0

  @rx.event
  def increment(self):
    self.count += 1

  @rx.event
  def decrement(self):
    self.count -= 1

@rx.page("/counter")
def counter():
  return rx.vstack(
    rx.text(f"The count is {CounterState.count}"),
    rx.hstack(
      rx.button("Decrement", on_click=CounterState.decrement),
      rx.button("Increment", on_click=CounterState.increment)
    )
  )
Notice that we are accessing state values in two different ways:
- Through
selfin the event handlers - Through the
CounterStateclass in thecountercomponent
As we discussed previously, component code is frontend code. The consequence is that the variable CounterState.count, when accessed within the counter component, is a Var - one of those placeholder values that are used to generate JavaScript code.
For example if we tried to display the square root, it would fail:
def counter():
  return rx.vstack(
    rx.text(f"The square root of the count is {sqrt(CounterState.count)}"),
    rx.hstack(
      rx.button("Decrement", on_click=CounterState.decrement),
      rx.button("Increment", on_click=CounterState.increment)
    )
  )
# TypeError: Cannot pass a Var to a built-in function. Consider moving the operation to the backend, using existing Var operations, or defining a custom Var operation.
This gives us the First Rule of Reflex States.
- State fields accessed through
selfare regular Python values. This happens in backend code. - State fields accessed through the class are Vars. This happens in frontend code.
This also highlights something very important: state values are transferred from your Python code to the JavaScript frontend. This means that Reflex needs to know how to serialize the data, send it over the wire, and deserialize it in the user's browser.
This gives us the Second Rule of Reflex States:
- Only store "plain" data in a state.
- Plain data can be:
Equipped with these two rules, Reflex states should pause no problem to you!
Little gotcha: if you copy/paste the Counter code above into your editor and hover CounterState.count in the component, it would be typed as int.
Reflex introduces a special annotation to allow Python to determine that CounterState.count is a Var:
class Counter(rx.State):
  count: rx.Field[int] = rx.field(0)
If you add this change to the square root example above, you will now rightfully get a type error for the sqrt operation, telling you it doesn't work on a NumberVar[int].
The Field annotation is not required, but it's recommended (you know I like type annotations 🤓)
But wait a second! We didn't solve our example with the square root.
Alright, we know we should compute it on the backend rather on the frontend. Do we have to recompute it in every event handler that updates count and store it in a count_sqrt field? We only have two event handlers here, but you can see how that would quickly become cumbersome.
Luckily, there's a better way...
Computed vars
Computed vars are derived values, recomputed every time the underlying data changes.
Computed vars are defined as a function annotated with @rx.var. Here's our earlier square root example.
from math import sqrt
import reflex as rx
import asyncio

class CounterState(rx.State):
  count: rx.Field[int] = rx.field(0)

  @rx.var
  def count_sqrt(self) -> float:
    return sqrt(self.count)

  @rx.event
  def increment(self):
    self.count += 1
    yield CounterState.decrement_after()

  @rx.event
  def decrement(self):
    self.count -= 1
    yield CounterState.increment_after()

@rx.page("/counter")
def counter():
  return rx.vstack(
    rx.text(f"The square root of the count is {CounterState.count_sqrt}"),
    rx.hstack(
      rx.button("Decrement", on_click=CounterState.decrement),
      rx.button("Increment", on_click=CounterState.increment)
    )
  )
Here, count_sqrt is a function that reruns every time a value in CounterState gets updated and sends its result value to the frontend. When used in the component, CounterState.count_sqrt is a NumberVar, just like the regular count.
The requirements for a computed var are:
- Has to be a function annotated with
@rx.var - Has to have a return type annotation that follows the "plain data" convention (see the section on states)
You can see that computed vars access state values through self. Going back to the First Rule of States, this means computed vars are backend code and can access state values as regular Python values. You can write arbitrary code within them.
This makes them really convenient for data transformations that would be annoying or impossible to do in frontend code.
As mentioned, computed vars are recalculated every time the state changes by default. In this case, it's fine for a lightweight calculation like square root. For more intensive or longer-running functions, we can define cached computed vars.
For example, here's how the Stoneware Flowsheets works:
class FlowsheetState(rx.State):
  flowsheet_id: rx.Field[str | None] = rx.field(None)

  nested_flowsheet: rx.Field[str | None] = rx.field(None)

  @rx.var(cache=True)
  async def flowsheet(self) -> dict | None:
    if self.flowsheet_id is None:
      return None
    data = await download_flowsheet(self.flowsheet_id)
    return data

  @rx.event
  def select_flowsheet(self, selected_id: str):
    self.flowsheet_id = selected_id
    self.nested_flowsheet = None # reset

  @rx.event
  def select_nested_flowsheet(self, nested_flowsheet: str | None):
    self.nested_flowsheet = nested_flowsheet
Here's a cool bit of Reflex magic: the flowsheet computed Var will be re-evaluated only when flowsheet_id changes. If nested_flowsheet changes, it will not rerun. Effectively, Reflex determines which other Vars your computed Var depends on and builds a dependency graph (similar to Dagster assets for instance).
Event handlers
Event handlers react to events, most often a user interaction, and update the application's state or trigger other event handlers.
Event handlers are defined as methods decorated with @rx.event on a state class. We've already seen an example in our Counter class.
class CounterState(rx.State):
  count: rx.Field[int] = rx.field(0)

  @rx.event
  def increment(self):
    self.count += 1

  @rx.event
  def decrement(self):
    self.count -= 1
Event handlers can also be async and trigger other events by returning or yielding them. Here's an example of a counter that resets after a little delay (so you can play at trying to get it as high as possible).
import reflex as rx
import asyncio

class CounterState(rx.State):
  count: rx.Field[int] = rx.field(0)

  @rx.event
  def increment(self):
    self.count += 1
    return CounterState.decrement_after()

  async def increment_after(self, delay_ms=500):
    await asyncio.sleep(delay_ms / 1000)
    self.count += 1

  @rx.event
  def decrement(self):
    self.count -= 1
    return CounterState.increment_after()

  async def decrement_after(self, delay_ms=500):
    await asyncio.sleep(delay_ms / 1000)
    self.count -= 1

@rx.page("/counter")
def counter():
  return rx.vstack(
    rx.text(f"The count is {CounterState.count}, the square root is {CounterState.count_sqrt}"),
    rx.hstack(
      rx.button("Decrement", on_click=CounterState.decrement),
      rx.button("Increment", on_click=CounterState.increment)
    )
  )
You may have noticed that the increment/decrement events are passed to the on_click prop of the rx.button component. Here, on_click is an event trigger, an interface point that allows a frontend component to call something on the backend. Event triggers are defined by built-in components and custom React wrappers.
The JavaScript convention is that event triggers always start with "on". In plain HTML, you would see <button onclick="...">. In React, you would see <button onClick="...">.
If you see a prop named on_xxx, you can assume it's an event trigger.
Summarizing, here are the four things to remember about events:
- Events are a way for the frontend to call and pass data to the backend.
- Events are called through pre-defined event triggers.
- Events are backend code, so you can write arbitrary Python code and access state values as Python values
- Events are the only place where state should be mutated.
There are also a few gotchas with events:
- A state class can only process one event at a time. This avoids concurrency problems.
- Async events are blocking by default. Since the state class only processes a single event at a time, if an async event is taking a while, it's going to block all other events.
- When triggering another event from a running event, you have to reference the other event(s) through the state class, not
self. See the example above withincrementandincrement_after- I'm not sure why this is required, but it enforces consistency with how events are referenced in frontend code.
Background events
There's one last concept we need to touch upon: background events. If you implemented our last example, with the increment event triggering the decrement_after event, which negates the increment after a 500ms delay, you may have noticed that if you click multiple times on "Increment" or "Decrement", the count is not very reactive.
This is explained by the warning above: while the state is processing the async event decrement_after, which immediately follows increment, it doesn't process any other event. This effectively causes the counter to halt for 500ms.
The way to solve this is through a background event.
Background events are defined with @rx.event(background=True) and require an async function. They also add a requirement that any state mutation has to be wrapped in an async with self context.
class CounterState(rx.State):
  # ... other code

  @rx.event(background=True)
  async def decrement_after(self, delay=500):
    await asyncio.sleep(delay/1000)
    async with self:
      self.count -= 1
Effectively, the background event decrement_after has to acquire an exclusive lock on the state before reading or modifying it. This ensures the state mutation doesn't happen concurrently with another event (or another state mutation from a background event).
While this makes the syntax more verbose, background events are very powerful and this syntax prevents you from encountering concurrency problems (which are very hard to troubleshoot).
Putting it all together, we can now have our counter, with a square root, whose count resets after a brief delay. It should respond really fast now, meaning you can now play at trying to get it as high as you can before it goes back to zero!
import asyncio
from math import sqrt

import reflex as rx


class CounterState(rx.State):
  count: rx.Field[int] = rx.field(0)

  @rx.var
  def count_sqrt(self) -> float:
    return sqrt(self.count)

  @rx.event
  def increment(self):
    self.count += 1
    yield CounterState.decrement_after()

  @rx.event(background=True)
  async def increment_after(self, delay_ms=500):
    await asyncio.sleep(delay_ms / 1000)
    async with self:
      self.count += 1

  @rx.event
  def decrement(self):
    self.count -= 1
    yield CounterState.increment_after()

  @rx.event(background=True)
  async def decrement_after(self, delay_ms=500):
    await asyncio.sleep(delay_ms / 1000)
    async with self:
      self.count -= 1


@rx.page("/counter")
def counter():
  return rx.vstack(
    rx.text(
      f"The count is {CounterState.count}, the square root is {CounterState.count_sqrt}"
    ),
    rx.hstack(
      rx.button("Decrement", on_click=CounterState.decrement),
      rx.button("Increment", on_click=CounterState.increment),
    ),
  )
Putting it all together
General Understanding
The key to mastering Reflex is understanding the frontend/backend split and keeping your mental model clear:
Frontend Code (Components):
- Components are reusable UI elements that get compiled to JavaScript/React
- Keep them really simple - focus only on presentation and styling
- No complex data transformations or business logic
- Only use Reflex-specific constructs like
rx.cond,rx.match, andrx.foreachfor control flow - Can only access state values as Vars (placeholder objects for JavaScript compilation)
Backend Code (Event Handlers & Computed Vars):
- Event handlers respond to user interactions and are the only place where state can be modified
- Computed vars derive values from state and recompute automatically when dependencies change
- Can perform any Python operations - database queries, API calls, complex calculations
- Access state values as regular Python objects through
self
State Management:
- State is shared between frontend and backend, but accessed differently in each context
- Only store "plain" data types:
int,float,bool,str,list,tuple,dict,set, or dataclasses - State serves as the bridge - when modified in event handlers, it triggers UI updates in components
The Flow:
- User interacts with a component (clicks button, types in input, etc.)
- Event handler runs on the backend, potentially modifying state
- Components rerender with updated state values
- React efficiently updates only the parts of the UI that changed
Gotchas
State Access Patterns:
self.count(in event handlers/computed vars) = regular PythonintStateClass.count(in components) =NumberVarfor JavaScript compilation- This distinction is crucial - you can't use
sqrt(StateClass.count)in a component!
Event Handler Limitations:
- Only one event handler runs at a time per state class (prevents concurrency issues)
- Async event handlers are blocking by default - use
@rx.event(background=True)for long-running operations - Background events require
async with self:context for state mutations - When chaining events, reference them through the state class:
yield StateClass.other_event(), notself.other_event()
Frontend Code Constraints:
- Can't use arbitrary Python functions like
math.sqrt()orlen()directly on Vars - Must use Reflex Var operations or move logic to computed vars/event handlers
if/elsestatements don't work - userx.cond()instead- Regular loops don't work - use
rx.foreach()instead
Performance:
- Computed vars recalculate on every state change by default - use
@rx.var(cache=True)for expensive operations - Cached computed vars only rerun when their dependencies change (Reflex builds a dependency graph automatically)
Advanced stuff
TODO:
- Backend vars
- Public vs backend methods
- Client storage
- Component states
Writing frontend code
In Reflex, all frontend code that defines the user interface gets compiled to JavaScript. Reflex does this by substituting the application state with Vars, that are not real values, but instead capture where those values are used and operations performed on them.
Once Reflex has this information, it translates it into React code to build the user-facing application.
As such, not all operations are allowed on Vars. Here's how regular Python maps to Reflex concepts
forloop ->rx.foreachif/else->rx.condmatch(or multiple consecutiveifs) ->rx.match
Supported Var Operations:
- Arithmetic:
+,-,*,/,//,%,pow(),-(negation),abs() - Comparisons:
==,!=,>,>=,<,<= - Logic: do not use
and,orandnot. Instead use&(AND),|(OR),~(NOT) - Strings:
.lower(),.upper(),.split(),.to_string() - Collections:
.contains()(use instead ofin),.reverse(),.join(),.length(), indexing with[]
Footnotes
-
This is roughly how our Excel formula generation works! ↩